Welcome to the Spoki MCP (Model Context Protocol) integration guide. This document helps you set up and connect Spoki to your preferred LLMs via MCP-compatible interfaces.
Spoki MCP allows seamless communication between Spoki’s backend and AI tools that support the Model Context Protocol. By integrating MCP, developers can empower Spoki to interact with models in a controlled, context-aware way.
Connecting to Spoki MCP #
A. n8n tools #
The steps to add the Spoki MCP Client as a tool within your n8n workflow. This allows your n8n AI Agent to interact with the Spoki MCP server.
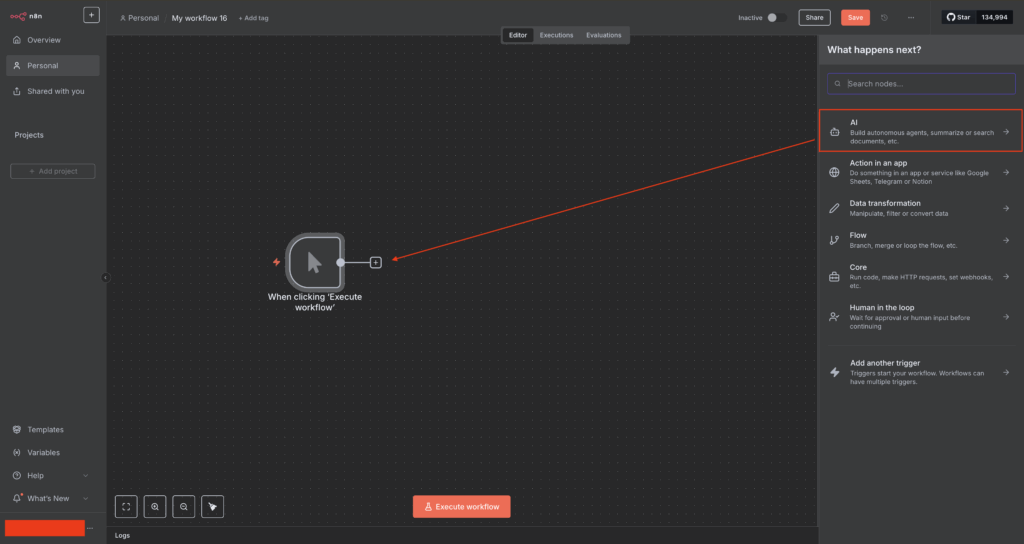
Step1. Start Your Workflow and Add an AI Agent #
- Begin by creating a new workflow in n8n or opening an existing one.
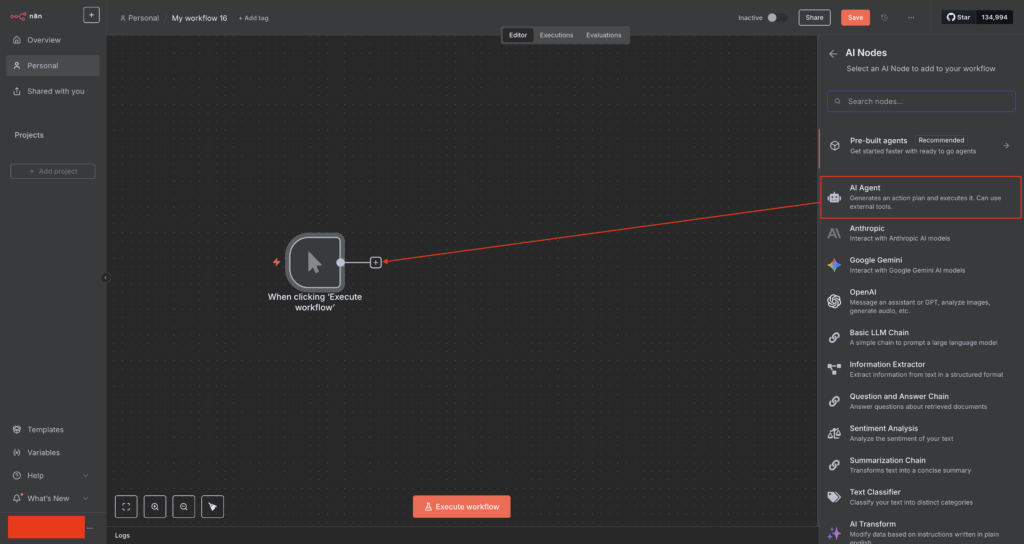
- Add the “AI Agent” node to your workflow. You can find this by clicking the “+” icon and searching for “AI Agent” under “AI Nodes.”
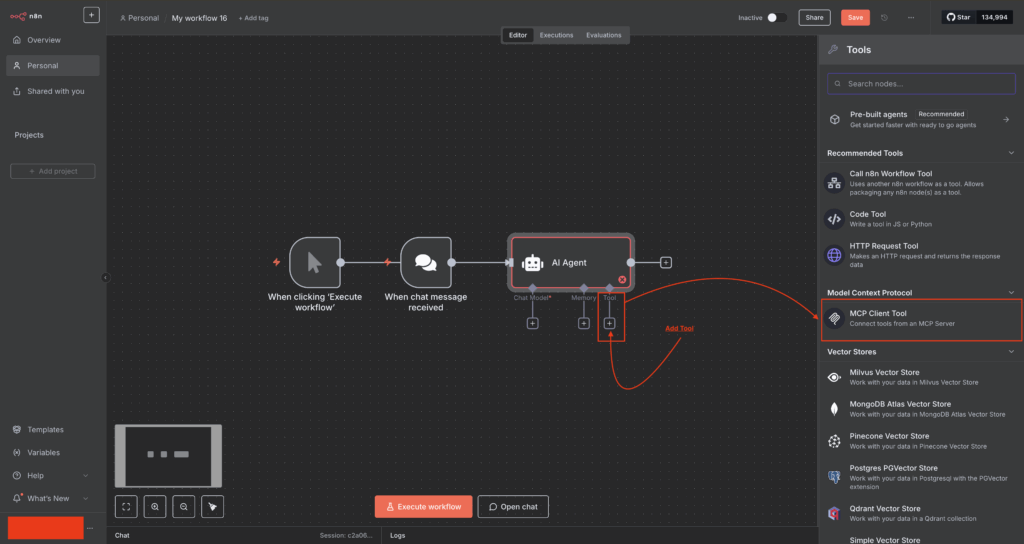
Step 2: Add the MCP Client Tool #
- Click the “+” icon next to the “Tool” section within the AI Agent node’s parameters.
- Search for and select “MCP Client Tool” from the list of available tools. This will add a new MCP Client node to your canvas.
Step 3: Configure the MCP Client Tool #
- Open the MCP Client Tool node’s parameters.
- In the “Endpoint” field, enter the URL of the Spoki MCP server:
https://mcp.spoki.com/v2/mcp. - Set “
Server Transport” to HTTP Streamable. - For “
Authentication,” select “Header Auth.” - Click on “Credential for Header Auth” and select “Create New.” This will open a new modal for your API key.
- In the new credential modal:
- Set “
Name” toX-Spoki-Api-Key. - In the “
Value” field, paste your Spoki API key (you can get one from app.spoki.it → Integrations → Spoki MCP → “Request Api Key”). - Click “Save.”
- Set “
- In the new credential modal:
- Back in the MCP Client Tool parameters, ensure that your newly created credential (“Spoki MCP Auth Header” or similar name you gave it) is selected for “Credential for Header Auth.”
- Under “Tools to Include,” you can either select “All” to allow the AI Agent access to every Spoki MCP tool, or “Selected” to pick specific ones from the dropdown (e.g.,
get_contacts,create_list,trigger_automation,create_ticket,submit_template). The dropdown always reflects the latest catalogue available to your account.


B. Streamable HTTP (mcp-remote) #
For MCP clients that connect through the mcp-remote proxy, use the http-only transport with the configuration below.
{
    "mcpServers": {
        "Spoki": {
            "command": "npx",
            "args": [
                "-y",
                "mcp-remote",
                "https://mcp.spoki.com/v2/mcp",
                "--header",
                "X-Spoki-Api-Key: <ApiKey>",
            ]
        }
    }
}
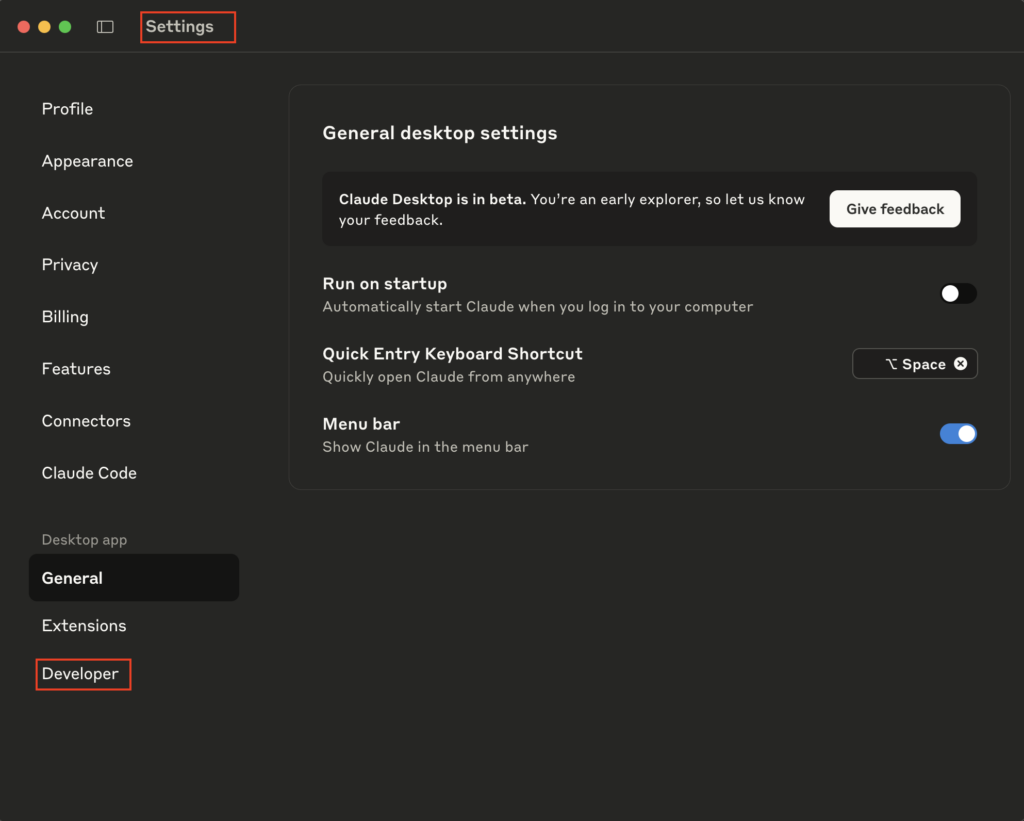
C. Configuring Local MCP Servers in Claude Desktop #
Step 1: Navigate to Developer Settings #
- Open the Claude Desktop application.
- Go to Settings.
- From the sidebar menu, select the Developer tab.
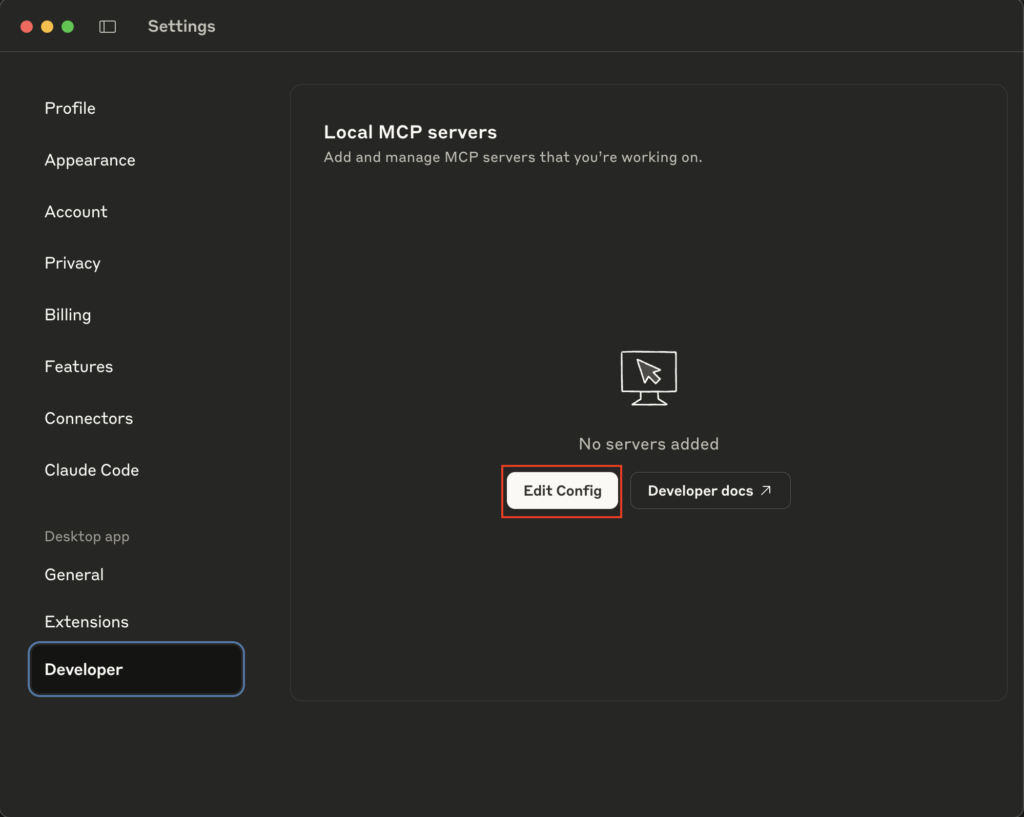
Step 2: Open the Configuration File #
In the “Developer” section, you will find the “Local MCP servers” management area.
- Click the Edit Config button.
- This will open the
claude_desktop_config.jsonfile in your default text editor.

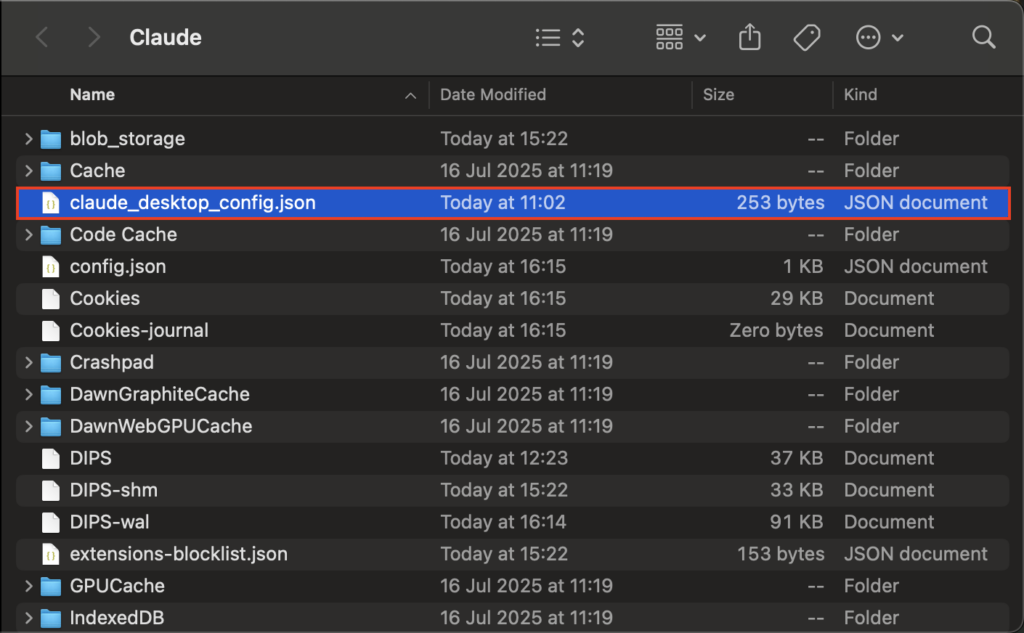
This configuration file is typically located in the application’s data directory, as shown in the file explorer example below.
Step 3: Add Your Server Configuration #
You will now add the specific command and arguments to connect to your server.
- In the
claude_desktop_config.jsonfile, add your server configuration inside themcpServersobject. - Each server is an object identified by a unique name (e.g.,
"spoki-remote"). - Provide the
commandandargsneeded to launch the localmcp-remoteproxy.
{
    "mcpServers": {
        "spoki-remote": {
            "command": "npx",
            "args": [
                "-y",
                "mcp-remote",
                "https://mcp.spoki.com/v2/mcp",
                "--header",
                "X-Spoki-Api-Key: <YOUR API KEY>",
            ]
        }
    }
}
Remember to replace <YOUR API KEY> with your actual API key. You can get one from app.spoki.it → Integrations → Spoki MCP → “Request Api Key”.
Step 4: Save and Restart #
- Save the
claude_desktop_config.jsonfile. - Quit and restart the Claude Desktop application for the changes to take effect.
After restarting, your local MCP server will be configured and should appear in the “Local MCP servers” list within the Developer settings.
Supported Tools & Actions #
Spoki MCP exposes a catalogue of tools to manage contacts, automations, campaigns, lists, templates, tags, custom fields, tickets, operators, and account analytics. Tools are discovered dynamically by your MCP client, so the dropdown always reflects what is currently available to your account (some tools — such as tickets — only appear when the corresponding feature is enabled on your account).
Contacts #
- get_contacts: Search and list contacts. Supports filtering by name/phone and blocked-only.
- get_contact: Retrieve a single contact by its numeric ID.
- get_or_create_contact: Get an existing contact by phone, creating it if missing. Returns the contact and a flag indicating whether it was newly created.
- update_contact: Update a contact’s profile (only the fields you provide).
- block_contact: Block or unblock a contact. Blocked contacts will not receive messages.
- add_tags_to_contact / remove_tags_from_contact / get_contact_tags: Manage tags on a contact.
- set_contact_field_value: Set a custom field value on a contact (create or update).
- search_contacts_advanced: Composite filters across tags, lists, language, email, etc.
Automations #
- get_automations: List automations with optional filtering by active status.
- get_automation: Get details of an automation by ID.
- activate_automation / deactivate_automation: Switch an automation on or off.
- trigger_automation: Manually trigger an active automation for a specific contact.
Campaigns #
- get_campaigns: List scheduled campaigns with optional date filters.
- get_campaign: Get a specific campaign by ID.
- create_campaign: Create a new scheduled campaign.
- get_upcoming_events: Upcoming holidays and events for campaign planning.
Lists #
- get_lists / get_list: List or retrieve contact lists.
- create_list / update_list / delete_list: Manage lists.
- create_list_from_filters: Build a list using advanced filter criteria.
- sync_contacts_to_list / add_filtered_contacts_to_list: Add contacts to a list (by IDs or by advanced filter).
- remove_contacts_from_list / remove_filtered_contacts_from_list / clear_list: Remove members from a list.
- get_import_job: Check the status of a contact import job.
- import_from_hubspot / import_from_klaviyo: Pull contacts from a HubSpot or Klaviyo list/segment into a new Spoki list.
Templates #
- get_templates: List message templates with optional search and approval-status filter.
- get_template: Retrieve a template (including localizations and components) by ID.
- create_template / update_template / delete_template: Manage templates.
- submit_template: Submit a template for WhatsApp provider approval.
Tags #
- get_tags / create_tag / update_tag / delete_tag: Manage tags.
- merge_tags: Merge a source tag into a target tag (reassigns contacts).
- get_tag_categories / create_tag_category: Manage tag categories.
Custom Fields #
- get_custom_fields / get_custom_field: List or retrieve custom fields.
- create_custom_field / update_custom_field / delete_custom_field: Manage custom fields.
- get_custom_field_usage: See where a custom field is referenced across automations and templates.
Tickets (available when the tickets feature is enabled on your account) #
- get_tickets: Browse and search support tickets.
- get_ticket: Retrieve a specific ticket with full details.
- create_ticket / update_ticket: Manage tickets.
- close_ticket: Close a ticket and set its closed timestamp.
- assign_ticket: Assign a ticket to an operator (or pass
owner_id=nullto unassign). - get_ticket_categories: List ticket categories available to the account.
Analytics & Operators #
- get_contact_stats: Total contacts plus lists and tags with contact counts.
- get_automation_stats: Total and active automation counts.
- get_campaign_performance: Performance breakdown per campaign.
- get_operators: List the operators (team members) on the account and their roles.
Resources & Support #
Need help? Contact us anytime at support@spoki.com.


