
External release message (customers) #
Subject: Your AI agent can now read Shopify metaobjects
Your Spoki AI agent can now answer with the content you keep in Shopify metaobjects, not only with what is on the product.
Many stores keep details that change by country or language in metaobjects: colours and coverings, images, prices, availability, delivery times. Until now the agent could only read products, so it could not tell a customer in France which colours of a sofa are sold in France. Now it can.
What the agent can do
- See which metaobject types your store has.
- Read the entries of a type and search them by name, for example a model and a country.
- Follow the links between entries, products and images.
The agent only reads content that is published and visible to your storefront. It never changes anything in your store.
What you need to do
The new options are switched off by default. If you do nothing, your agent keeps working exactly as it does today. To use them:
- Add the metaobject permissions to the Shopify app you connected to Spoki: read_metaobjects, read_metaobject_definitions and read_files, next to read_products.
- In Spoki, open your Shopify integration under AI Agents > Integrations and Tools and save it again, or create a new one.
- Switch on the three new options: List Metaobject Definitions, Get Metaobjects, Get Metaobject.
The step-by-step guide is below, for an existing app and for a new one. If you need help, write to Spoki support.
Internal release message (Support, CS, Sales, AI team) #
Subject: AI agent can read Shopify metaobjects (opt-in per customer)
The AI agent’s Shopify tool has three new read-only options that read metaobjects directly from the customer’s store. It was built for poltronesofà, whose product is a generic container while colours, images, prices and availability per country live in metaobjects.
What shipped
- Three options in the Shopify integration: List Metaobject Definitions, Get Metaobjects, Get Metaobject.
- The agent reads live from Shopify with the customer’s own credentials. Nothing is stored in Spoki.
- Only published content is returned: types with storefront access, active entries, active products.
- No change in the web app was needed. The options appear in the existing Shopify integration form.
Who is affected
Nobody, until they opt in. The options are off by default, and existing integrations keep working unchanged.
What a customer must do to use it
- Add read_metaobjects, read_metaobject_definitions and read_files to their Shopify app. read_products is also required; customers who followed our setup guide already have it.
- Save their Shopify integration again in Spoki (or create a new one), so the permissions are re-checked.
- Switch on the three options and save.
- Add a sentence to the agent’s prompt saying that country-dependent content is in the metaobjects.
What Support should know
| Symptom | Cause | What to do |
|---|---|---|
| The three options show “Missing required permissions” | The Shopify app lacks one of the four scopes | Follow the setup guide below, then save the integration again |
| The options do not appear on an old integration | The integration was saved before the release | Open it, save the credentials again |
| The agent says a type or entry does not exist | The type has no storefront access, or the entry is a draft | Enable storefront access on the metaobject definition, set the entry to Active |
| The agent answers from the product and ignores metaobjects | The prompt does not mention them | Add the prompt sentence from the guide |
| The agent cannot find an entry | Search matches words in the entry name only | Name entries with the model and country, or ask with the exact name |
Limits to be aware of
- The agent must know the customer’s country from the conversation. It is not detected automatically.
- Search works on the entry name. A store that names entries differently makes the agent page through them, which is slower.
- Tested on staging with a test store (5 of 5 country questions answered correctly). Not yet used by a real customer.
Status and owner
Pull request spoki-ai #658, awaiting AI team review. Tracked in the Notion task Shopify MetaObjects.
Setup guide: before you start #
You need four Shopify permissions (scopes) on the app connected to Spoki, and your metaobjects must be published.
| Scope | Why it is needed | Likely already there? |
|---|---|---|
| read_metaobjects | Read the metaobject entries | No, new |
| read_metaobject_definitions | Read the metaobject types and their fields | No, new |
| read_files | Read the images and files linked from an entry | No, new |
| read_products | Read the products linked from an entry | Yes, if you followed the Spoki Shopify guide |
If one of the four is missing, the three options stay disabled in Spoki with a “Missing required permissions” warning.
Two things to check in your Shopify admin, under Content > Metaobjects:
- Storefront access is on for each metaobject definition the agent should read. Types without storefront access are hidden from the agent.
- Entries are Active, not Draft. Draft entries are hidden from the agent.
Then follow the guide that matches your app:
- A. You connected Spoki with a Client ID and Client Secret (Dev Dashboard app).
- B. You connected Spoki with an Admin API access token (older custom app created in your store admin).
- C. You have no app yet, or you prefer a separate one.
A. Existing app with Client ID and Client Secret (Dev Dashboard) #
You add the scopes by releasing a new version of your app. Your Client ID and Client Secret stay the same.
- Open the Shopify Dev Dashboard and select the app you connected to Spoki.
- In the left menu, click Versions, then Create version (top right). The form opens pre-filled from your current version.
- In the API access section, find the Scopes field. Keep everything that is already there and add, separated by commas: read_metaobjects,read_metaobject_definitions,read_files. Add read_products too if it is not in the list.
- Leave the other fields as they are and click Release at the bottom of the form.
- In your Shopify store admin, go to Settings > Apps and sales channels, open the app, and approve the updated permissions if Shopify asks.
- Continue with “In Spoki” below.
Use the Scopes field, not Optional scopes: optional scopes are not granted automatically.
B. Existing app with an Admin API access token (older custom app) #
This is the app described in the current help article, Connect Shopify to Spoki AI Sales Agent, created in your store admin under Develop apps. You add the scopes in the app’s configuration.
- In your Shopify admin, go to Settings > Apps and sales channels > Develop apps.
- Open the app you created for Spoki (for example “Spoki AI Integration”).
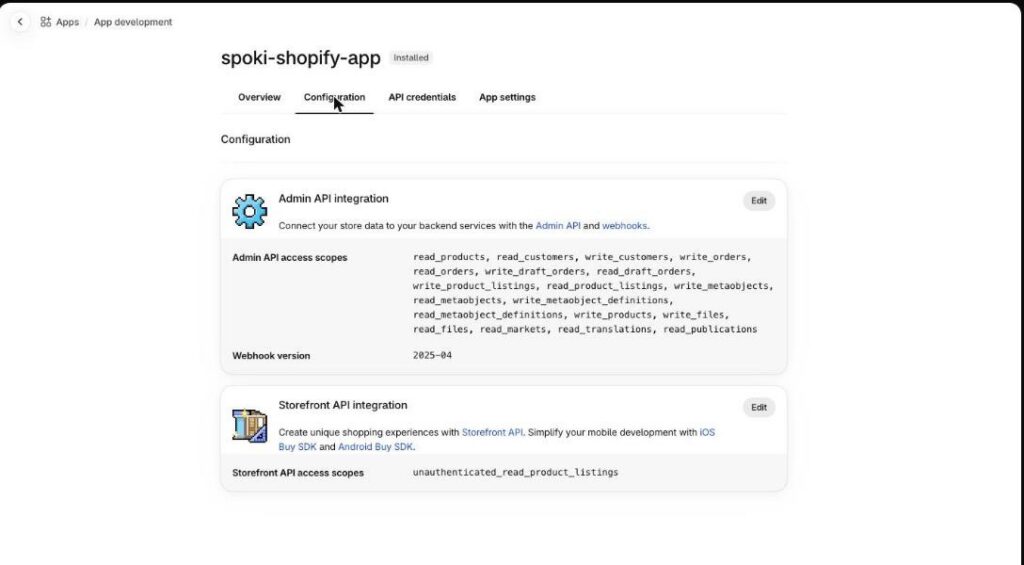
- Open the Configuration tab. In Admin API integration, click Edit (or Configure).
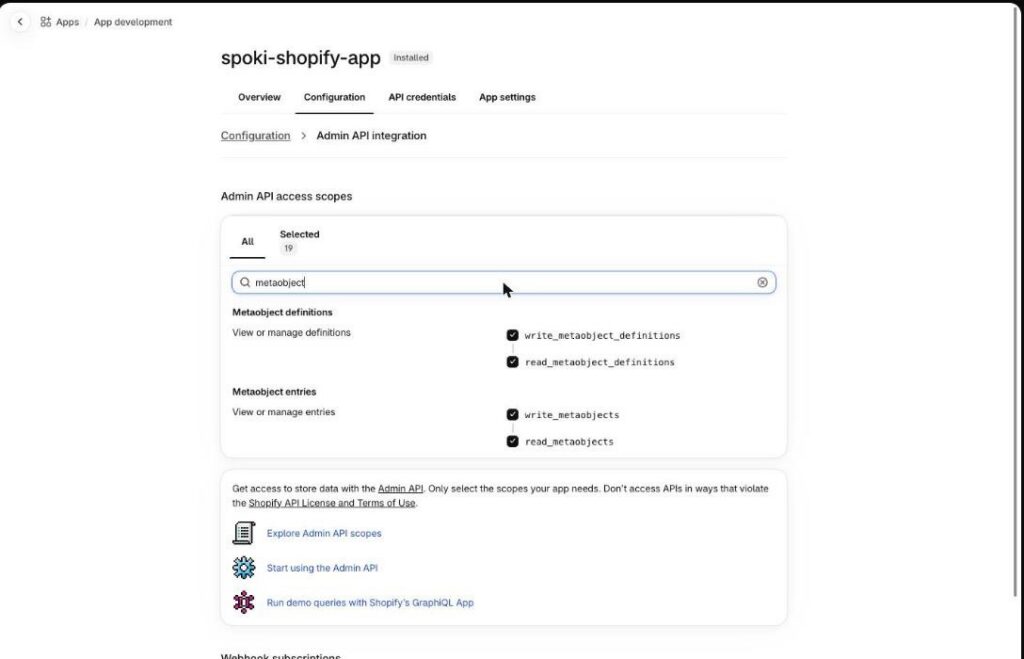
- Search for and tick read_metaobjects, read_metaobject_definitions and read_files. Check that read_products is ticked.
- Click Save.
- Continue with “In Spoki” below. Use the same Admin API access token as before.
The Configuration tab lists the scopes the app has today. Click Edit on Admin API integration to change them:
Type “metaobject” in the filter to find the two metaobject scopes, tick the read_ ones, then filter for “files” and tick read_files:
After saving, open the API credentials tab. If Shopify shows a new Admin API access token with Reveal token once, copy it and replace the token in your Spoki integration. The token is shown only once.
To confirm before sending: whether Shopify always issues a new token after a scope change on these older apps. The screens above are from our test store, where the scopes are already added; I did not change scopes there to test it.
C. New app #
Shopify no longer lets you create the older custom apps in the store admin, so a new app is created in the Dev Dashboard. The full walkthrough is in the help article for the new method: Connect your Shopify store to Spoki AI Sales Agent (Dev Dashboard). The only difference is the list of scopes.
- Open the Shopify Dev Dashboard and create an app.
- Create its first version. In API access > Scopes, enter the scopes from the Spoki guide and add the metaobject ones. The complete list:
read_products,read_product_listings,write_product_listings,read_orders,write_orders,read_customers,write_customers,read_draft_orders,write_draft_orders,read_metaobjects,read_metaobject_definitions,read_files
- Click Release.
- Install the app on your store.
- In the app’s Settings page, copy the Client ID and the Client secret.
- Continue with “In Spoki” below and create a new Shopify integration with these credentials.
If the agent only needs to read products and metaobjects, the four scopes from “Before you start” are enough. The order and customer options then stay disabled in Spoki.
In Spoki: switch the options on #
Spoki checks the Shopify permissions when you save the integration, so it must be saved again after the scopes change.
If you already have a Shopify integration
- Go to AI Agents > Integrations and Tools.
- Open your Shopify integration and save the credentials again, without changing them.
- In the list of Shopify options, switch on List Metaobject Definitions, Get Metaobjects and Get Metaobject.
- Save.
If you are creating a new one
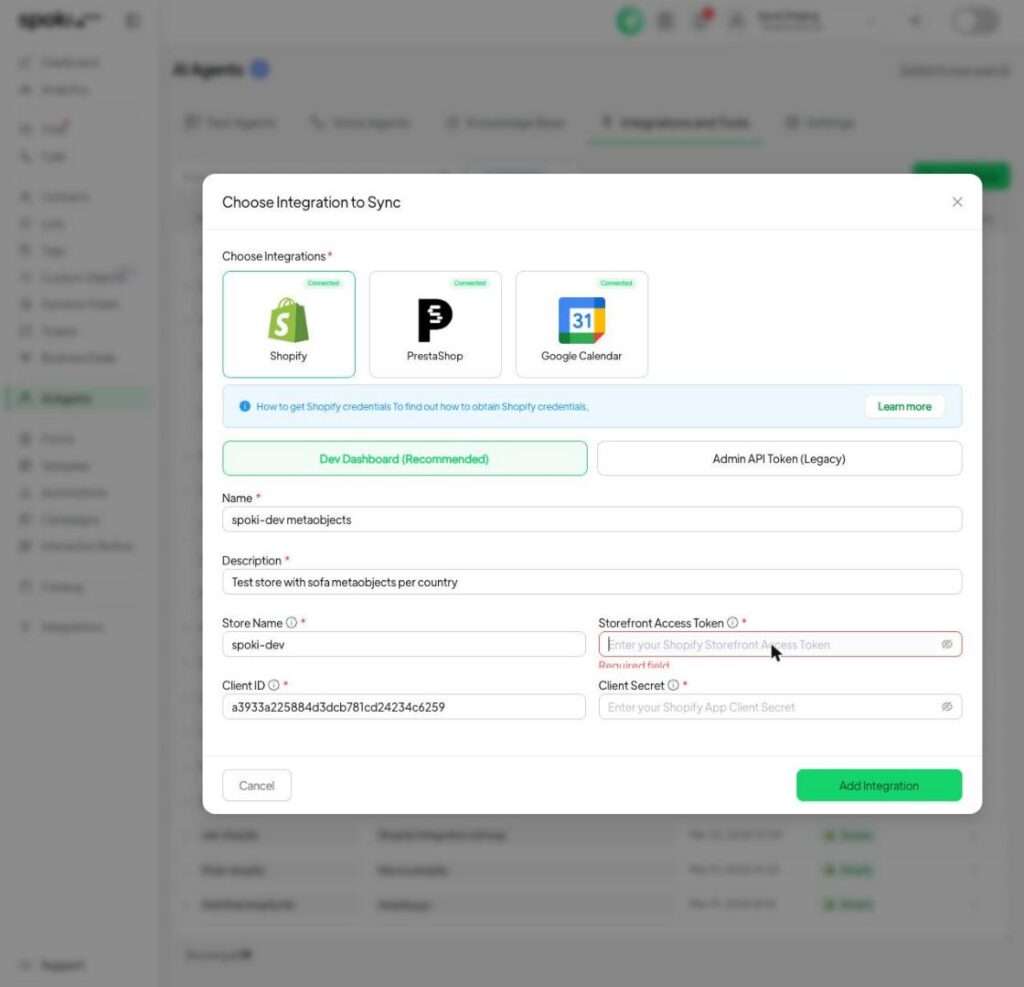
- Go to AI Agents > Integrations and Tools and click Add Tools, then Create Integration, then Shopify.
- Choose Dev Dashboard (Recommended) and enter a name, a description, your store name, the Storefront Access Token, the Client ID and the Client Secret. For an older app, choose Admin API Token (Legacy) instead.
- Click Add Integration. The list of options appears.
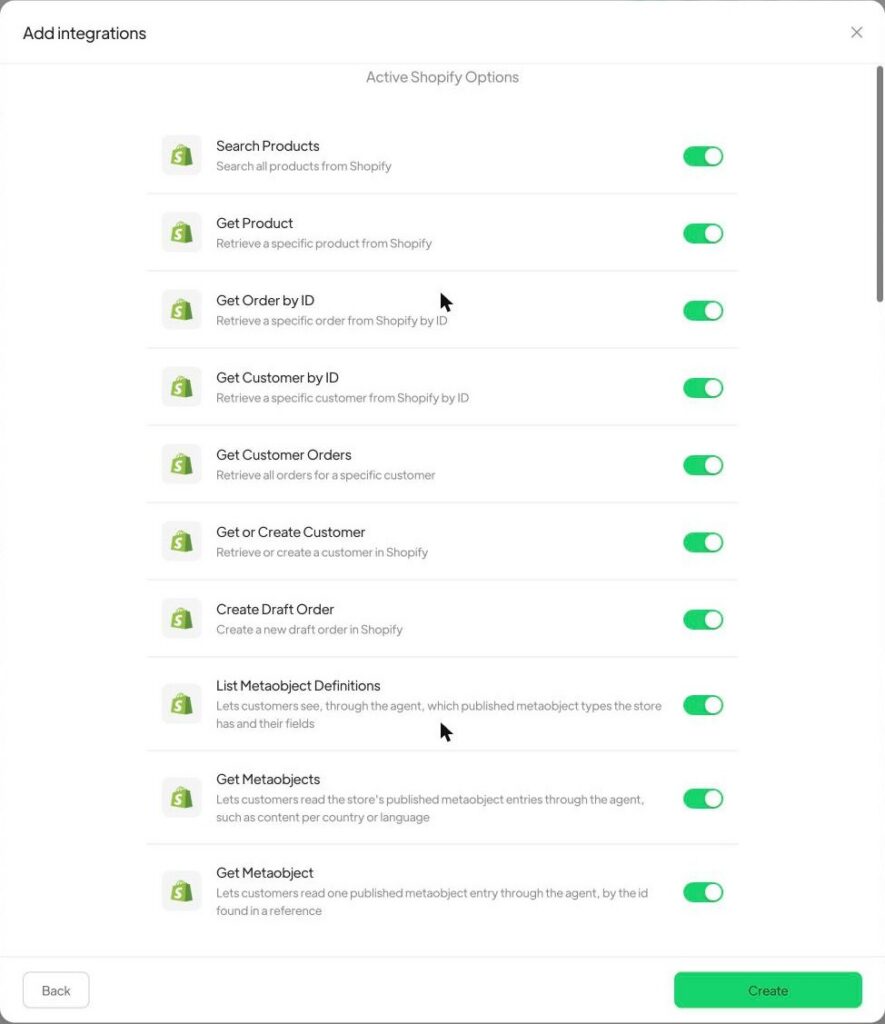
- Switch on the three metaobject options, plus the others you use, and click Create.
- Open your agent, go to its Tools tab, click Add Tools and select the integration.
The Shopify integration form in Spoki, with the two connection methods at the top:
The three metaobject options are at the bottom of the Shopify options list. When the app has every permission, all options can be switched on:
Tell the agent where to look
Add a sentence like this to the agent’s prompt, adapted to your store:
Colours, images, prices and availability depend on the customer’s country and are stored in the store’s Shopify metaobjects, not in the products. Always look them up with the metaobject tools before answering, and never guess.
Without it the agent may answer from the product alone.
Check that it works #
Open the agent’s Playground and ask a question whose answer depends on a metaobject, for example “Which colours is the Lario sofa available in for France?”. The agent should answer with the entries of that country only.
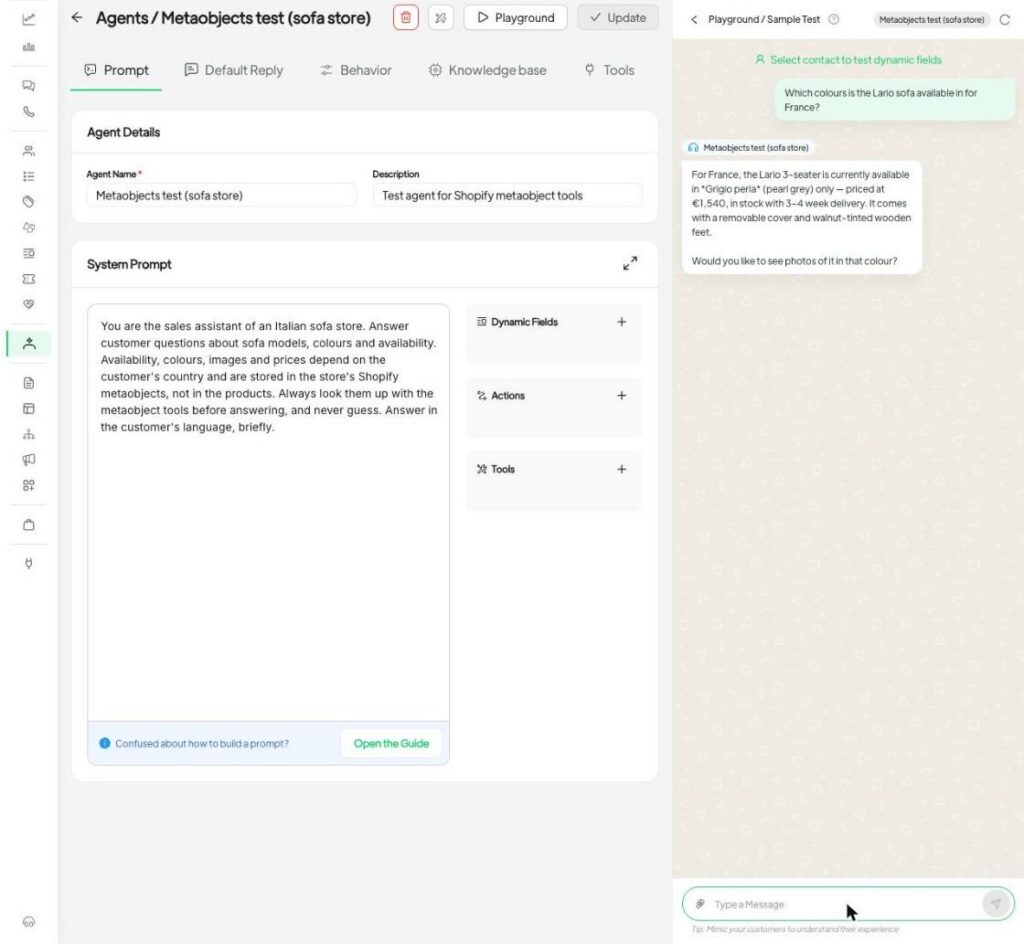
On our staging test store the agent answered these five questions correctly:
| Question | Agent’s answer |
|---|---|
| Which colours is the Lario sofa available in for France? | Grigio perla only, 1,540 EUR |
| Which colours is the Lario sofa available in for Italy? | Sabbia, Grigio perla, Blu notte |
| Is the Taormina sofa sold in Spain? | No, Italy only |
| Is the Dolomiti sofa sold in Spain? | No, Italy and France only |
| Is the Siena sofa available in Terracotta in Italy? | No, only Cuoio naturale in Italy |
If something is wrong
| What you see | What to check |
|---|---|
| “Missing required permissions” on the three options | One of the four scopes is missing, or the store has not approved the app update. Fix it, then save the integration again |
| The options are not in the list | Save the integration’s credentials again |
| The agent cannot find a metaobject type | Storefront access is off for that definition in Shopify |
| The agent cannot find an entry | The entry is a Draft, or its name does not contain the words asked for |
| The agent ignores metaobjects | Add the prompt sentence above |