Skip to content
Supporto Spoki

Documentation for Spoki use

  • English
    • Italiano
    • Español
  • English
    • Italiano
    • Español

How to

81
  • “Transform Contact Field” step: when and how to use it
  • Practical guide: how to write a prompt that works
  • How to create a simple automation from the Campaigns section
  • Spoki on your Smartphone – Web App and Notifications
  • “Delay” Step: When and How to Use It
  • Quick Action “If/Else”
  • How to Filter Chats by One or More Tags/Agents/Lists/Tickets
  • Marketing Consent on Spoki: Operational Guide
  • Guide to the Branching Option in Automations
  • Introduction to Using the OTP Code
  • Guida allo step “Attendi risposta”
  • How to Upload a Contact List on Spoki: A Step-by-Step Guide
  • Crafting AI Prompts
  • How to send the content of a message to an external webhook
  • Multiple steps in automation
  • HOW TO TRACK CLICKS ON TEMPLATE MESSAGE LINKS: UTM
  • How to write documents for AI
  • Template suggested by Artificial Intelligence (AI)
  • How to create a marketing funnel on Shopify
  • Integrating Spoki with Meta Listings
  • How to build your own AI Agent
  • Restore all blocked contacts
  • Translate messages and replies if the contact has a different language
  • Transcription and translation of audio in chat
  • Permanently delete a contact on Spoki
  • How to export all messages from a chat as CSV
  • How to change media in the Template before sending it in chat
  • How to create a list for contacts in a specific automation step
  • New features of Active Campaign
  • How to populate a dynamic field
  • How to activate catalog display on WhatsApp
  • How to add Tag in automation before inserting it
  • How to generate a list from Campaign Statistics
  • How to segment clients within Automations.
  • How not to let your recharge expire
  • How to automatically manage who replies/does not reply to a message
  • How to terminate automation manually for specific contacts
  • How to change media in Template before sending it to chat
  • How to export all chat messages as CSV
  • Audio transcription and translation in chat
  • Delete contact permanently on Spoki
  • Train artificial intelligence (AI) on Spoki
  • How to set up a CTA with dynamic field
  • How to automatically manage who replies/doesn’t reply to a message
  • Free messages with buttons
  • How to get a single contact out of all automations
  • Spoki – first steps
  • How to transfer contacts from your Whatsapp app to Spoki
  • How to handle cases when I have to send a chat reply to a customer after 24 hours?
  • How to withdraw from Spoki service
  • HOW TO LINK SPOKI TO FACEBOOK INTERACTION CAMPAIGNS
  • How to manage booking Calendly + Active Campaign + Spoki
  • How to consult automation reporting
  • How to send multi-language messages
  • How can I identify which user has replied in chat to a message?
  • How to populate a dynamic field via CSV upload and submit a campaign
  • How to enable automation for birthday greeting message
  • How to automatically handle those who do not respond
  • How to activate the Woocommerce plugin associated with Spoki Pro
  • How to enable automation for non-working hours
  • How to link Spoki to Facebook campaigns
  • How to activate an automatic message to run on holidays
  • How to link a Chat Button on the website to an automated response
  • How to insert WhatsApp chat button on WordPress site
  • How to update Spoki’s WhatsApp profile
  • Recommended proportions for images in Whatsapp messages
  • How to create template button response automation
  • How to start an automation with API
  • How to enable notifications on Spoki
  • How to lock/unlock contacts automatically
  • How to create new users and assign different roles
  • How to integrate Spoki for your customers into your software
  • How to recover abandoned shopping carts on Woocommerce
  • How to Automatically Send a Reminder Message Using Spoki
  • How to duplicate automations/ templates
  • Managing Free Messages in the Automation Flow
  • How to attribute or remove tags to contacts in a list
  • How to delete multiple contacts
  • Migration from old Twilio provider
  • View only unread chats
  • How to Use the Return Webhook from Spoki to Zapier

Integrations

38
  • Integrate WhatsApp with Google Sheets
  • Integrating Spoki with Facebook forms.
  • Integrating Spoki with Brevo (formerly sendinblue)
  • Integrating WhatsApp with Zapier
  • Integrating WhatsApp with Hubspot
  • Integrating WhatsApp with Qapla’
  • Integrating WhatsApp with ActiveCampaign
  • Klaviyo and Spoki Integration.
  • Integrating WhatsApp with IFTTT
  • Integrate WhatsApp with Zoho
  • Integrate WhatsApp to WPNotif
  • Integrate WhatsApp with Semplisio
  • Integrating Spoki with Webhooks
  • Integrate Spoki with any management system via API
  • Integrating Calendly with Spoki
  • How to send a Webhook out of Spoki vs. a management system
  • Integrating WhatsApp with Paypal
  • Connect Shopify to Spoki AI Sales Agent
  • Zadarma
  • Setting Up Your Spoki Voice Agent
  • Microsoft Dynamics 365 Integration
  • Spoki WhatsApp Chat Chrome Extension
  • Integrate Prestashop to WhatsApp
  • WhatsApp and WooCommerce Integration
  • Integrate WhatsApp with Google Calendar
  • Embed Spoki on your Software
  • Spoki Integration with Connectif: Automating WhatsApp Messages
  • Integrate WhatsApp with Shopify
  • Insert Chat Button on Shopify
  • Get Started with Spoki MCP
  • Sync Klaviyo Lists and Segments with Spoki
  • Gorgias
  • Make
  • Shopify App
  • Ringover
  • Magnews Flow
  • Salesforce Flow

Platform

16
  • Lists
  • Dynamic fields
  • Import CSV from Lists
  • Apply for OBA (Official Business Account) WhatsApp
  • Ticket
  • How to verify the authenticity of Spoki emails
  • Deals – User Guide
  • Contact
  • Dashboard
  • Chat
  • Campaigns
  • Template messages
  • Chat buttons
  • Tags
  • Integrations
  • Automations

Onboarding

10
  • Guide to migrating your free Meta number
  • Guide to migrating your number with WhatsApp Business (coexistence)
  • Activation of Spoki with a free Meta number
  • Guide to migrating your number
  • 2a. Accepting notification from Tyntec
  • Attivazione Spoki – Autorizzazione da Meta BM (numero WhatsApp Business)
  • 2. Verify Meta Business Manager
  • Before activating Spoki: What you need to know about your existing WhatsApp number
  • Plans and prices | Spoki
  • 3. Spoki Training Course

Strategies

11
  • WhatsApp Strategies for Christmas: The Complete Guide to Maximizing Sales and Customer Satisfaction
  • WhatsApp That Sells – Mini Strategic Guide by Sector
  • WhatsApp for E-commerce: How to Turn Conversations into Sales with Spoki
  • Why Spoki AI is Essential in Every Communication and Sales Strategy
  • Reach All Your Contacts Without Exceptions: SMS Integrated into Spoki Automations
  • Practical Guide to Creating, Optimizing, and Approving WhatsApp Templates with Spoki and ChatGPT
  • The 6 Most Effective Automations to Use with Spoki
  • Tips for mass mailings over 10,000 contacts

WhatsApp rules

8
  • “Daily” contact limits
  • Quality of messages sent
  • Types of messages
  • What to do if you have been banned from WhatsApp
  • What to do if your account is in low quality
  • Authorization for use
  • Conversations: Costs and Usage
  • Rules to avoid ban from WhatsApp

Release Notes

4
  • Carousel Template
  • Report Tickets
  • Commerce Triggers
  • Automation step “Start automation”
  • Home
  • Docs
  • Integrations
  • Connect Shopify to Spoki AI Sales Agent
View Categories

Connect Shopify to Spoki AI Sales Agent

Part 1: Generating API Credentials in Shopify

To integrate your Shopify store with Spoki, you need to create a custom app within your Shopify admin panel. This process will generate the necessary API credentials that allow Spoki to securely connect to your store.

This guide will walk you through the entire process step-by-step. At the end, you will have four pieces of information to enter into your Spoki account:

  1. Shopify Email
  2. Store Name
  3. Shopify Admin Access Token
  4. Storefront Access Token

Let’s get started!

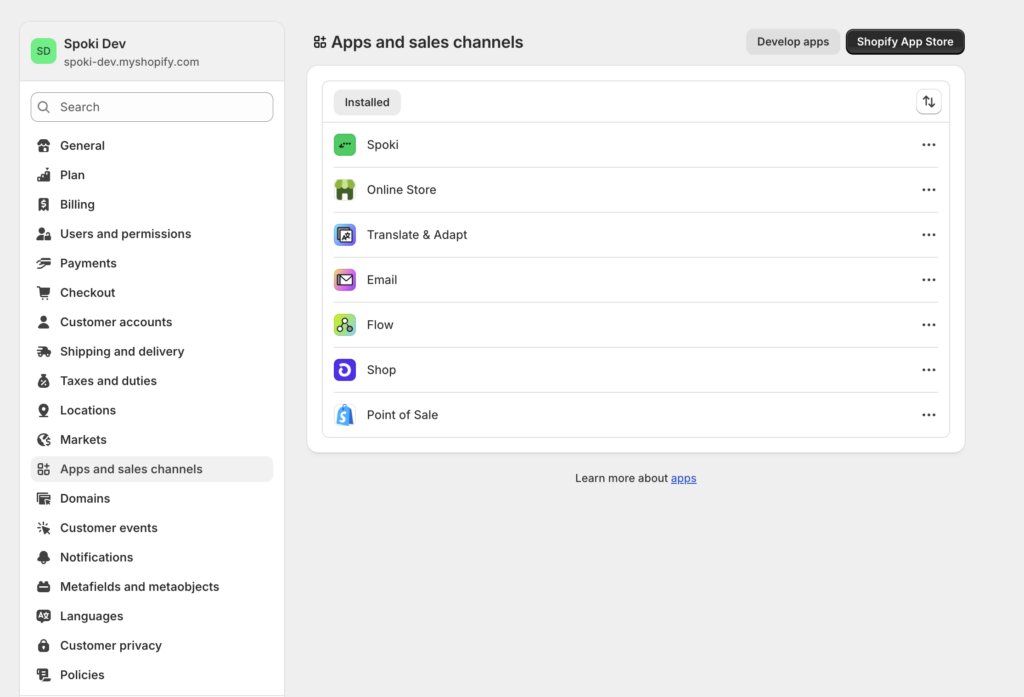
Step 1: Navigate to Apps and Sales Channels #

  1. Log in to your Shopify admin dashboard.
  2. On the left-hand navigation menu, click on Settings.
  3. In the Settings menu, click on Apps and sales channels.
  4. Click the Develop apps button.

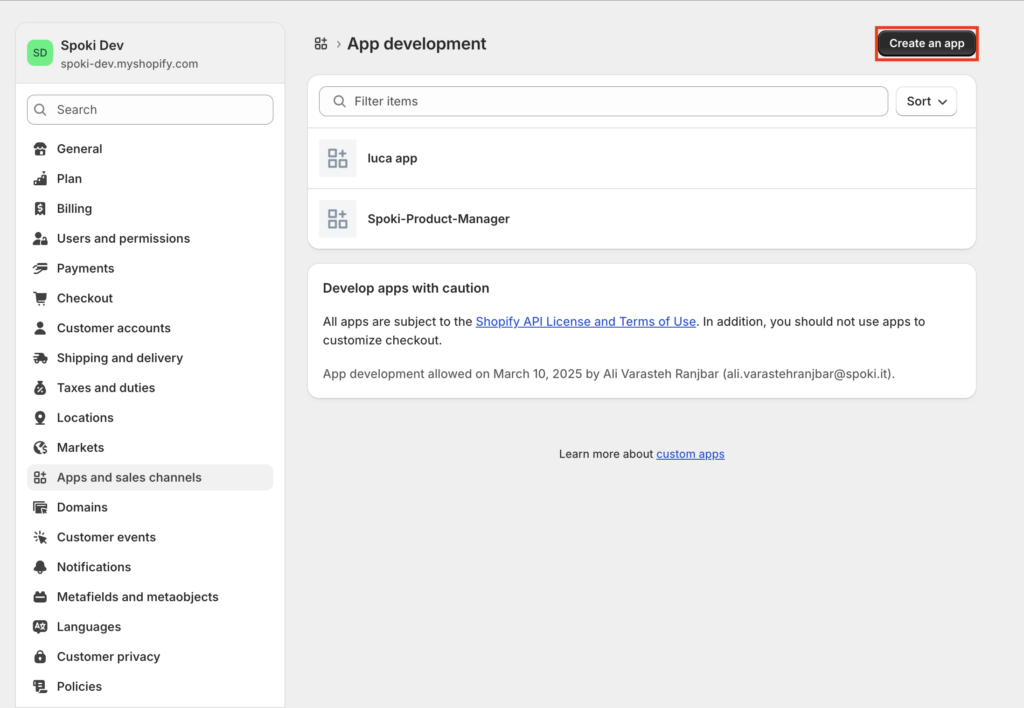
Step 2: Create a New Custom App #

  1. On the “App development” page, click the Create an app button in the top right corner.
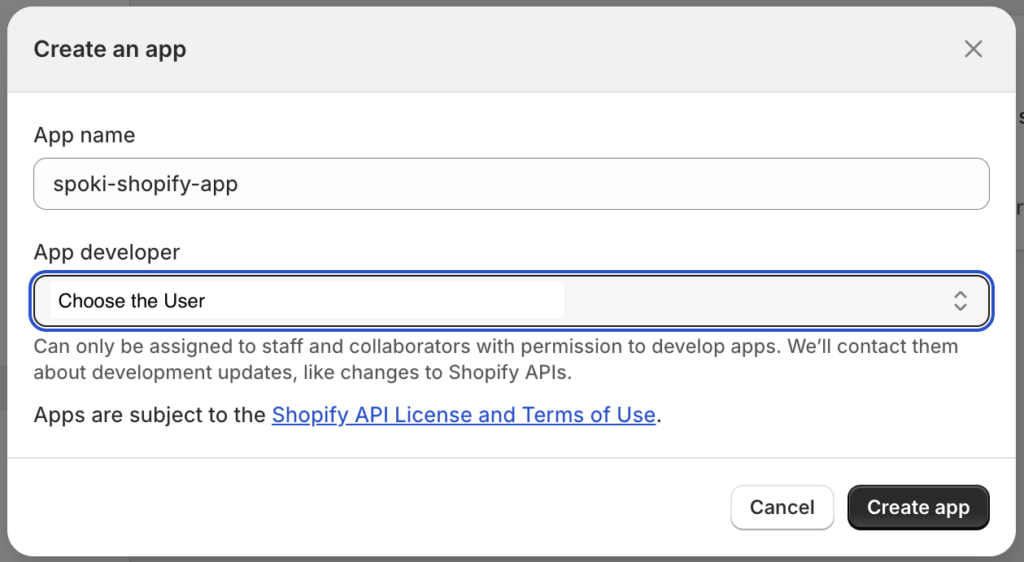
  2. A pop-up window will appear.
    • In the App name field, enter a name that you’ll recognize, such as Spoki AI Integration.
    • In the App developer dropdown, select your name or the store owner’s account.
    • Click Create app.

Step 3: Configure Admin API Scopes (Permissions) #

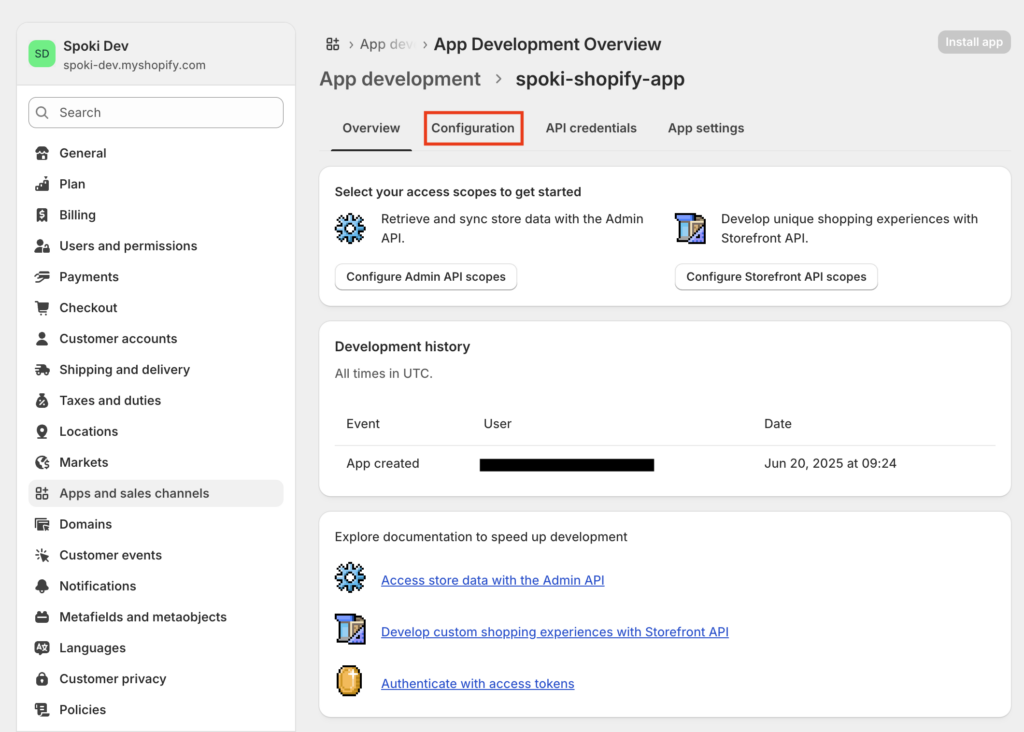
After creating the app, you’ll land on its overview page. Now you need to grant it the necessary permissions to manage your products, orders, etc.

  1. Click on the Configuration tab.
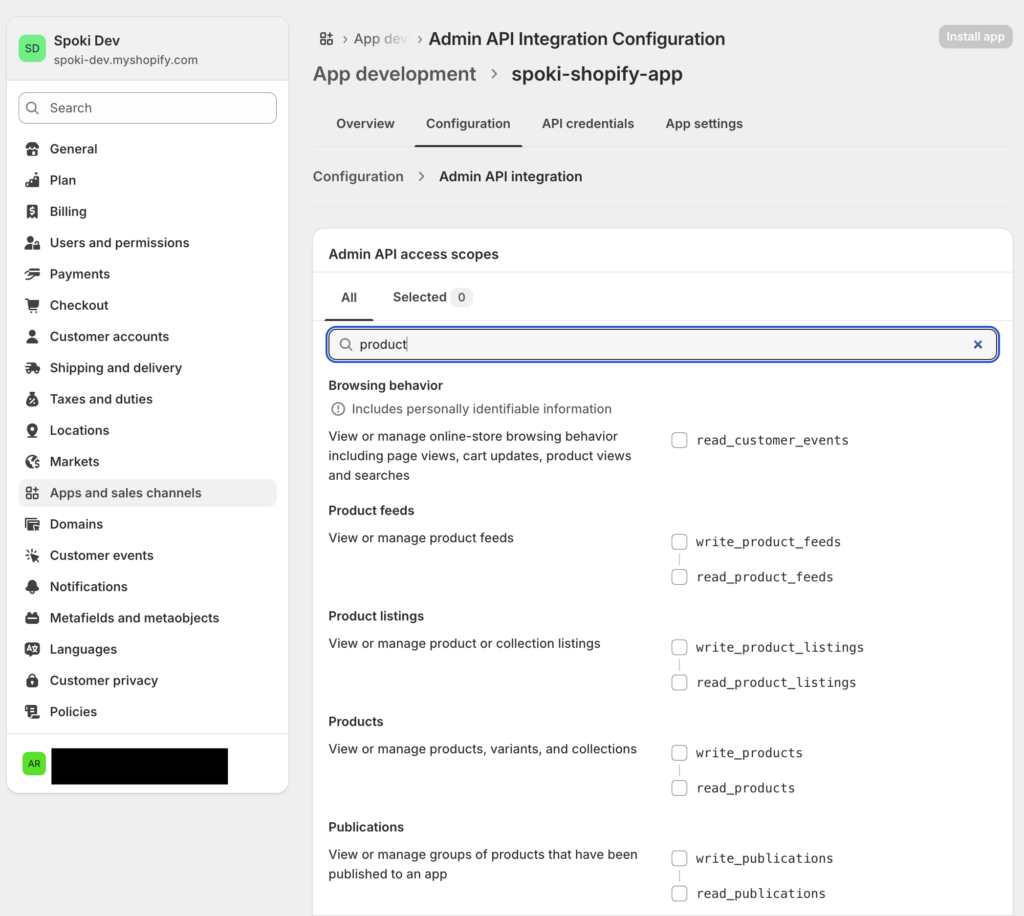
  1. Configure Admin API Scopes:
    • In the “Admin API integration” section, click Configure.
    • Select the following permissions by checking the boxes next to them
      • read_products
      • write_product_listings and read_product_listings
      • write_orders and read_orders
      • write_customers and read_customers
      • write_draft_orders and read_draft_orders
    • Click Save.
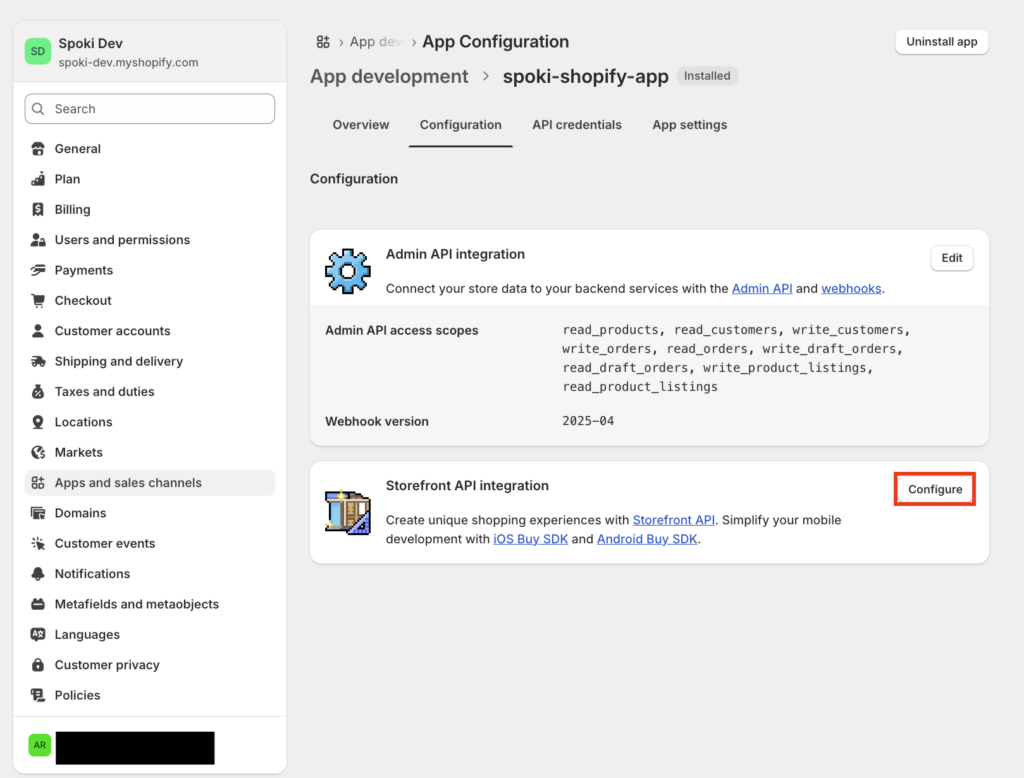
  1. Configure Storefront API Scopes:
    • Go back to the Configuration tab.
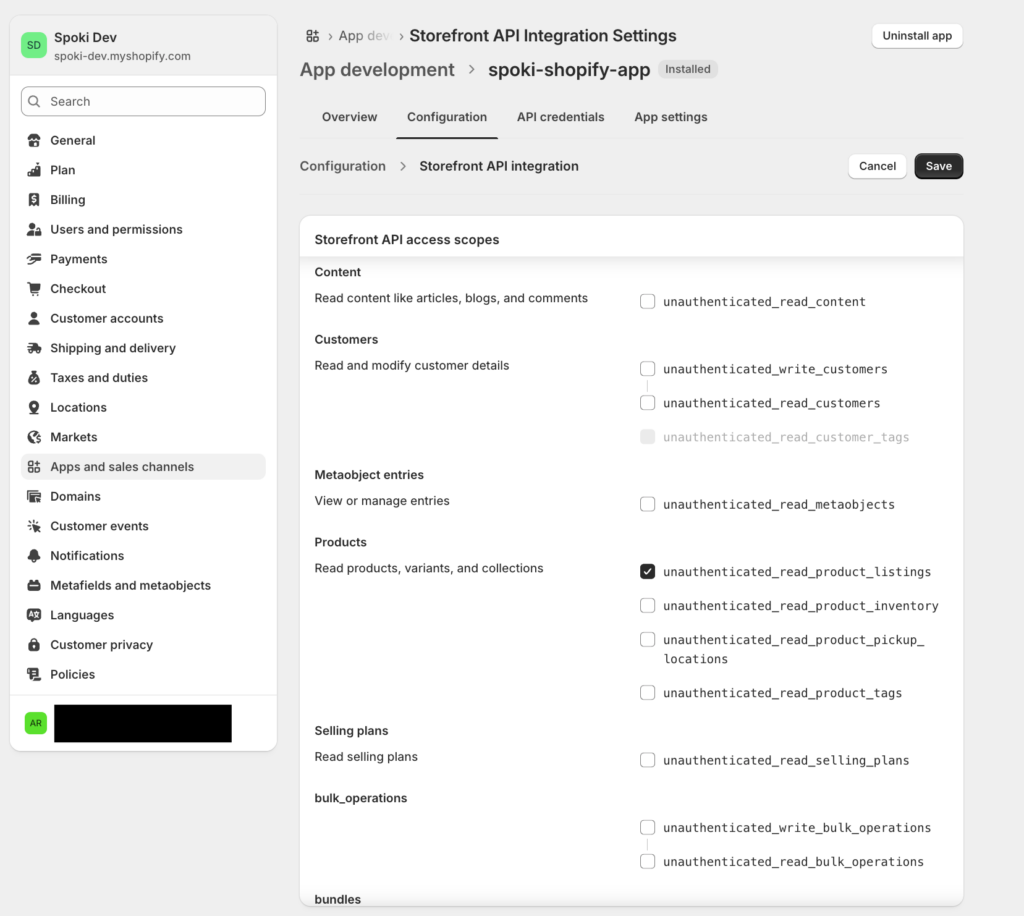
    • Scroll down to the “Storefront API integration” section and click Configure.
    • Select the permissions needed for the Spoki AI to search your store, such as unauthenticated_read_product_listings. (Note: Select all scopes recommended by Spoki for full functionality).
    • Click Save.

Step 4: Install the App and Retrieve Your Credentials #

Now that the permissions are configured, you can install the app on your store to generate the final API credentials.

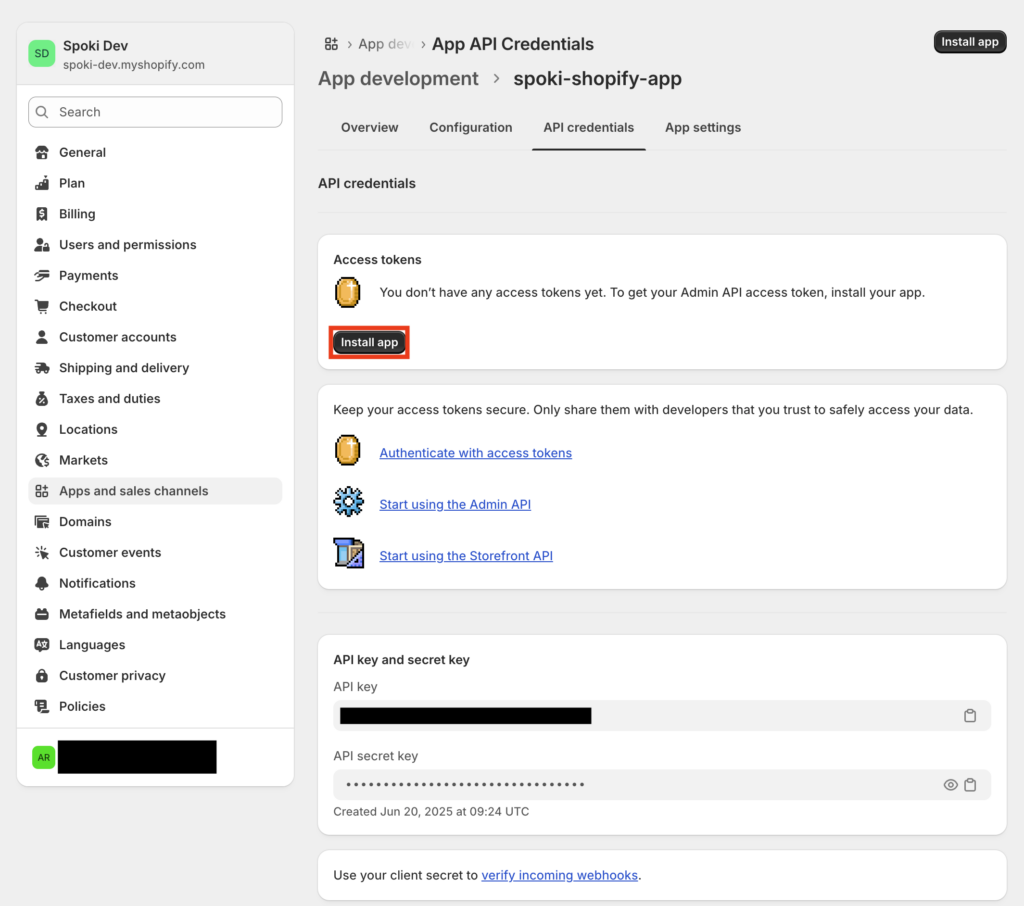
  1. Click on the API credentials tab.
  2. Click the Install app button at the top right.
  3. A confirmation pop-up will appear. Click Install.

Step 5: Copy Your API Keys and Access Token #

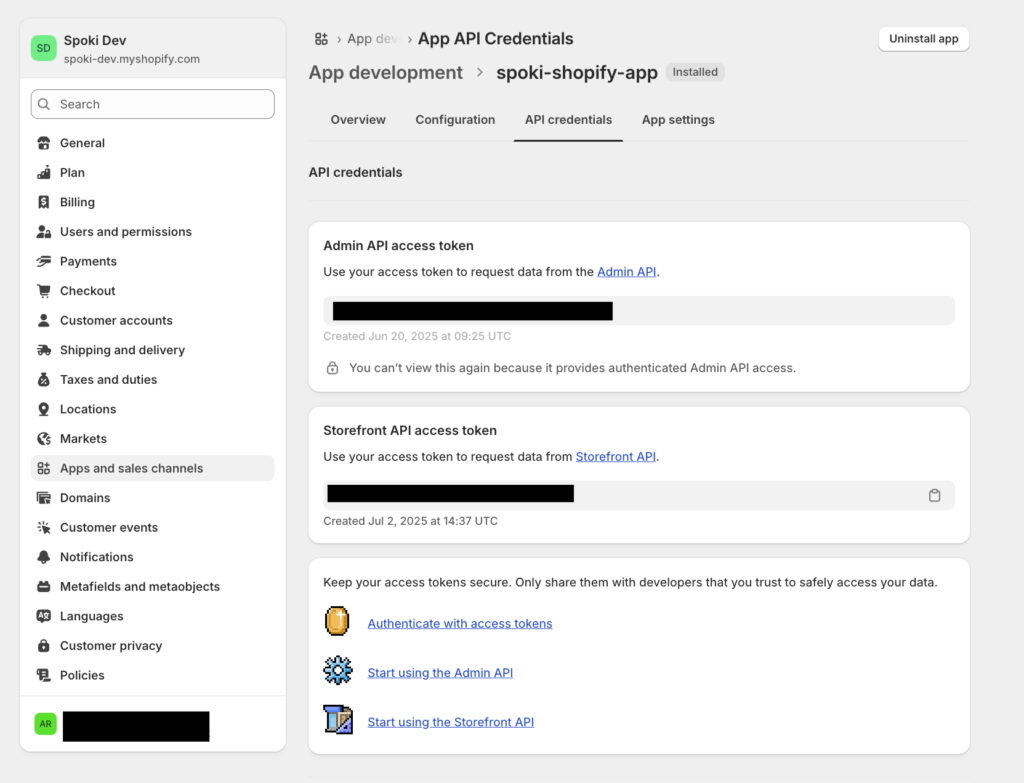
After installation, you will be taken back to the API credentials page. This is where you will find all the keys needed for the Spoki integration.

IMPORTANT: The Admin API access token is only shown ONCE. For security reasons, you cannot view it again after you leave this page. Please copy it and save it in a safe place immediately.

  1. In the “Admin API access token” section, click Reveal token once.
  2. The token will be revealed. Copy this token and paste it into the corresponding field in your Spoki setup page.
  3. The Storefront API access token will be visible. Copy this value as well.
Part 2: Connecting to Spoki #

Now that you have your Shopify credentials, let’s enter them into your Spoki dashboard.

Step 1: Navigate to AI Integrations in Spoki #

  1. In your Spoki dashboard, go to the AI section from the left-hand menu.
  2. Select the Integrations and Tools tab.
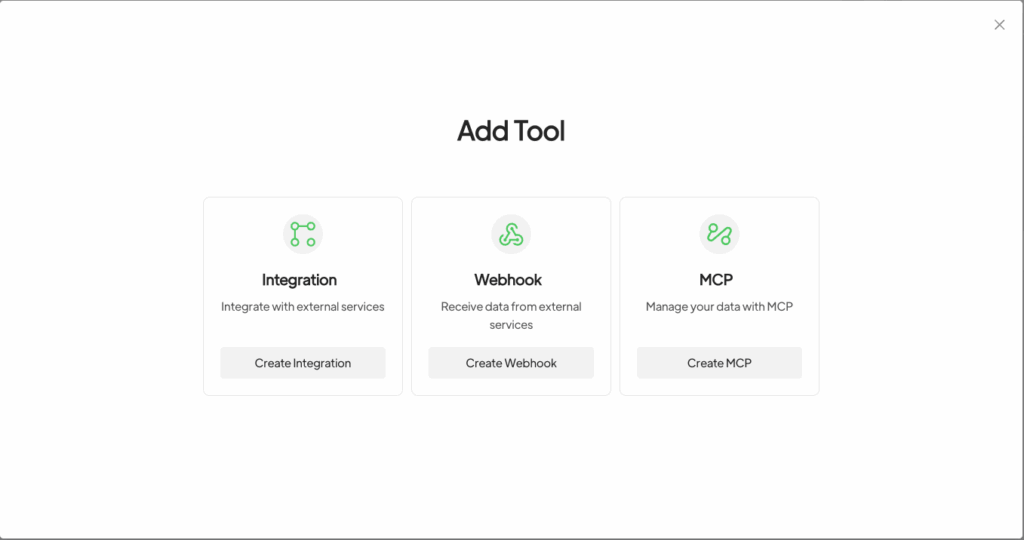
  3. Scroll down to the AI Integrations section and click the Add Integrations button.
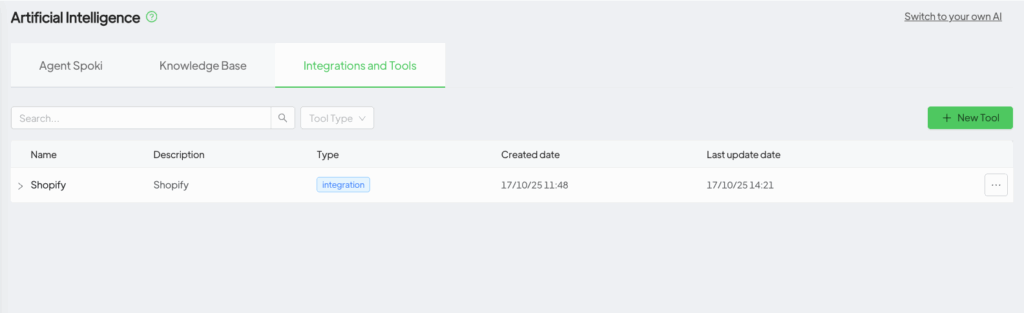
Step 2: Choose the Shopify Integration #

  1. A pop-up will appear listing available integrations.
  2. Click on Shopify to proceed.

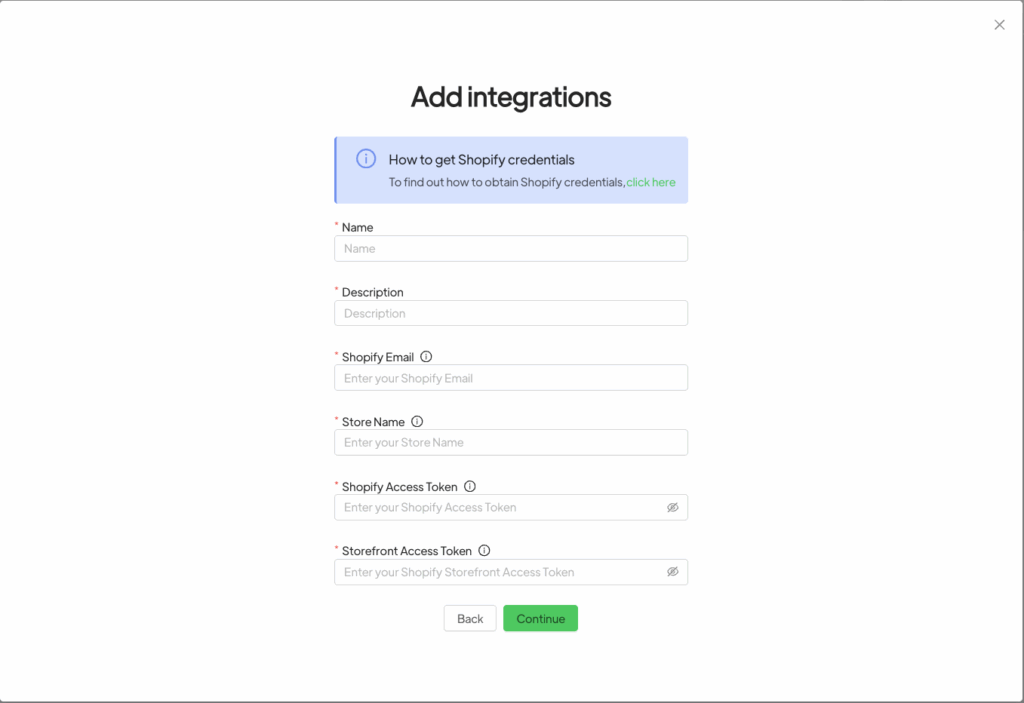
Step 3: Enter Your Shopify Credentials #

This is where you’ll paste the information you gathered in Part 1.

  • Shopify Email: Enter the email address you use to log in to Shopify.
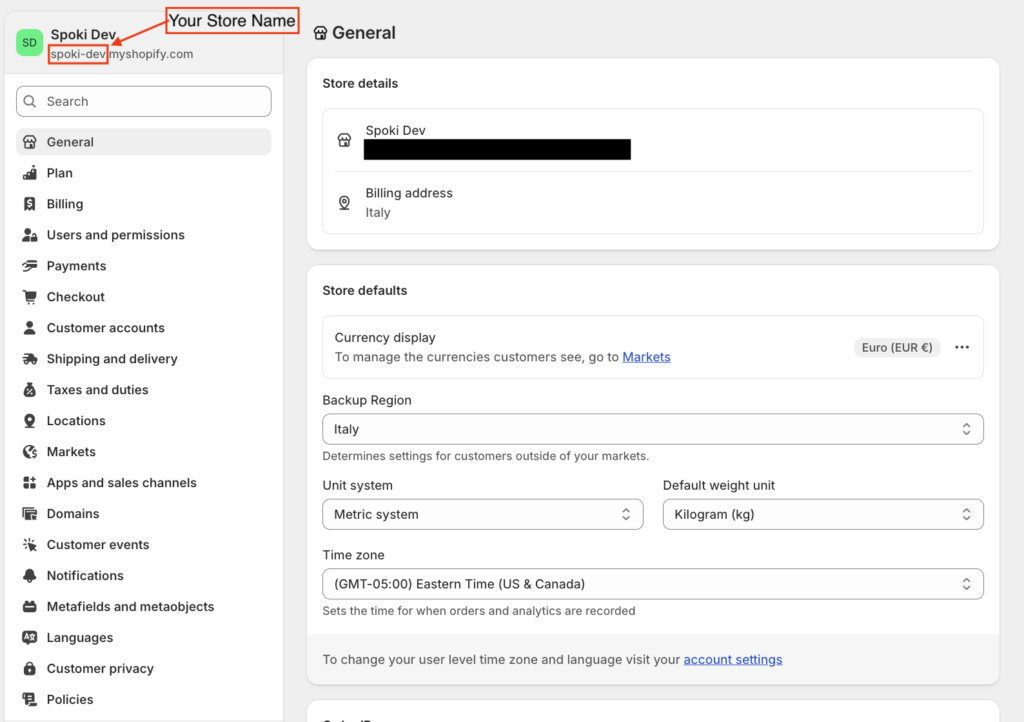
  • Store Name: Enter the unique part of your <your-store-name>.myshopify.com URL. For example, if your URL is spoki-dev.myshopify.com, you would enter spoki-dev.
  • Shopify Access Token: Paste the Admin API Access Token you copied from Shopify in Part 1, Step 5.
  • Storefront Access Token: Paste the Storefront API Access Token you copied from Shopify in Part 1, Step 5.

Once all fields are filled, click Save.

Step 4: Activate Shopify Options #

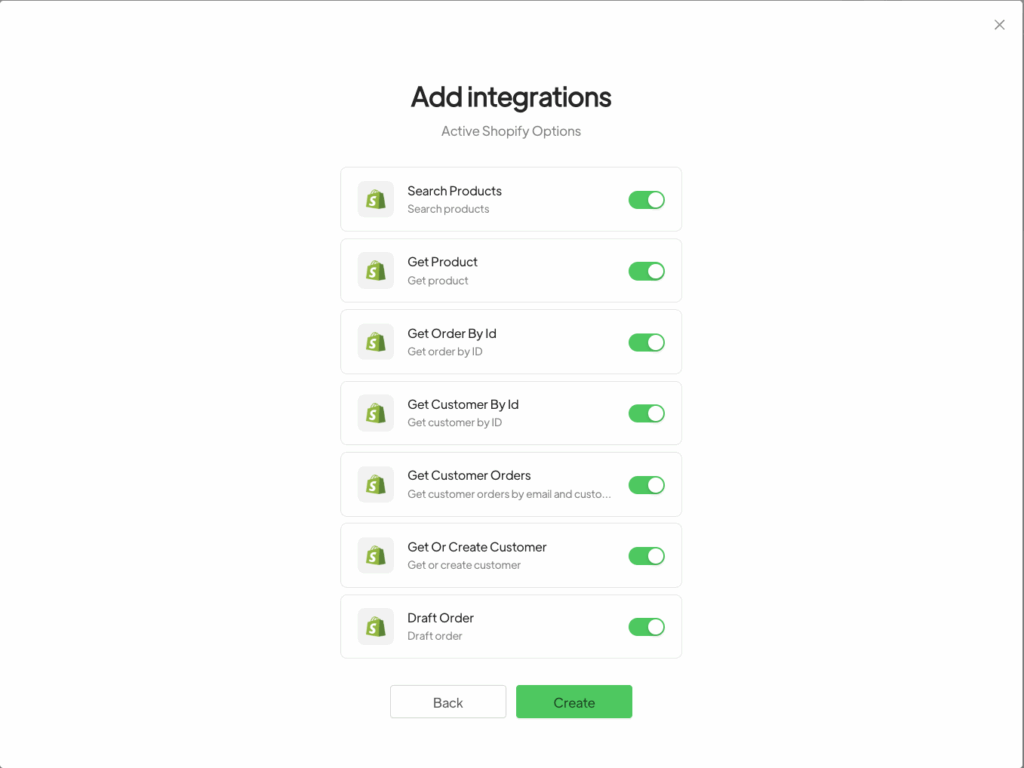
After saving your credentials, you will be taken to the final step where you can activate the specific AI functions you want to use.

  1. Toggle on the features you want the Spoki AI to handle, such as Search Products, Get Order by ID, Create Draft Order, etc.
  2. Click Save.

Congratulations! Your Shopify store is now fully integrated with your Spoki AI Sales Agent. The connection is active, and the AI can now use the functions you enabled.


Key Shopify Documentation Links: #

  1. Custom Apps Overview: Explains what custom apps are and why they are used.
    • Custom Apps
  2. API Access Scopes: A developer page that explains what permissions (scopes) are and why they’re needed. Very useful for users who want to understand what they are granting access to.
    • Scopes
  3. Admin API Authentication: Explains how the Admin API tokens work.
    • Api Access Tokens
  4. Storefront API Overview: Explains what the Storefront API is used for.
    • Storefront

Related Articles:
the integrate whatsapp with shopify guide

What are your Feelings

Share This Article :

  • Facebook
  • X
  • LinkedIn
  • Pinterest
Still stuck? How can we help?

How can we help?

Updated on August 4, 2026
ZadarmaSync Klaviyo Lists and Segments with Spoki

Powered by BetterDocs

Table of Contents
  • Step 1: Navigate to Apps and Sales Channels
  • Step 2: Create a New Custom App
  • Step 3: Configure Admin API Scopes (Permissions)
  • Step 4: Install the App and Retrieve Your Credentials
  • Step 5: Copy Your API Keys and Access Token
  • Part 2: Connecting to Spoki
    • Step 1: Navigate to AI Integrations in Spoki
    • Step 2: Choose the Shopify Integration
    • Step 3: Enter Your Shopify Credentials
    • Step 4: Activate Shopify Options
  • Key Shopify Documentation Links:
DEVELOP YOUR BUSINESS WITH SPOKI AND WHATSAPP
Try now for free

Contacts

  • info@spoki.it
  • +39 351 5495135
  • Informativa Privacy

Menu

  • Home
  • Prices
  • Functionality
  • Integrations
  • Artificial Intelligence
  • About us

Solutions

  • Marketing
  • Sales
  • Customer Care
  • Developers

Support

  • API Documentation
  • Blog
  • Case Study
  • Learning Center
  • Manual

Spoki.it © All rights reserved NextAI Srl P.IVA IT02717930743 Viale Francia snc, 72019 San Vito Dei Normanni (BR) Italy

Soluzioni

  • Marketing
  • Vendita
  • Assistenza Clienti
  • Developers
  • Italiano (Italian)
  • English
  • Español (Spanish)